Thursday 23 September 2021

Ostomy Pouch Bag

Individuals with ostomies can have a slight fear of not being able to handle the pouching system correctly and in result cause complications. A stoma can be placed in many different ways and the placement could potentially determine how one should care for it. 

Pre-cut pouching systems allow for a range of proper care from a flange opening of 3/4 inches (19mm), 1/8 of an inch (3-4mm) to 1 and 3/4ths of an inch (44mm) or even possibly a 2 inch (51mm) opening. These increments are set a little bit larger than the average stoma placement in order to fit around it properly. If the opening of the flange happens to be the same size of your stoma, this could cause issues and trauma to the stoma. If your stoma is in a convex flange placement, the pre-cut pouch being a bit larger matters quite a bit. A convexed flange tends to be a bit firmer than the flatter counterpart which requires a little more wiggle room. It is extremely important to understand that not all stoma pouches come in a pre-cut option, so if a pre-cut is what you desire than consider switching different name brands.


If a certain brand does not have the pre-cut option then it is possible to cut the flange carefully with flange cutters. These specialty designed scissors are cylindrical metal devices with a sharp blade-like edge that are made to cut swiftly through the flange. Flange cutters are available in round and oval shapes to make the process a bit more easier. When using flange cutters it is to be noted that flanges should be cut on a solid surface to prevent any damages to the surface beneath it. 


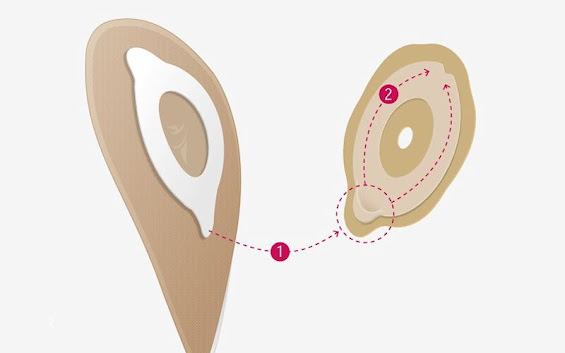
Newly designed technology called CMT, or ConvaTec Moldable Technology, is another option when it comes to ostomy care. This technology is designed using a special pliable technology that allows you to form the opening of the flange to the desired shape and size needed. In order to use this product you will do the following:

  • Using your fingers, carefully roll the inner edge of the flange outwards until it meets the desired shape and size needed.

  • Once firmly applied, the rolled edge will unravel until it touches your stoma.

  • Once the edge meets the stoma, it will form a soft cuff around the stoma.

  • This cuff will expand and shrink during normal function due to its elasticity. 


The benefits of this new, upcoming technology is that unlike most traditional barriers, the worry of the barrier coming into contact with your stoma is gone. The logic behind this is that the technology has been designed to dismiss any trauma to the stoma itself. However, this product has been mainly designed for protruding stomas only. If the stoma is not raised then there is no barrier preventing the rolled edge from unraveling and uncovering the stoma. The ConvaTec Moldable Technology comes in a two piece system and for some ostomy patients can be a hassle if they are desiring a one piece application.


When undergoing an ostomy surgery, do not be afraid to seek help from physicians and pharmacies as to what supplies could be better suited for you. Most pharmacies and medical supple stores are prepared to offer flange-cutting services to those in need for a small charge and possible even free. Always be sure to use your outsource when looking for all possible opportunities, as they are out there and ready to assist when needed. 


Friday 10 September 2021

How to Prevent Stoma Fluid Leakage

If you have an ostomy, stoma fluid leakage can be pretty frustrating. In fact, one study shows that as many as 33% of ostomates experience leaks at least once per week. While leaks are often inevitable, there are some things you can do to help prevent them from happening as often as they do now. Here are some tips to follow if you want to stay leak-free and active with your ostomy!


What is Stoma Fluid?

Ostomy fluid is a fluid that builds up inside of your stoma, which is created when your intestine is diverted through an opening in your abdomen. While it’s normal for some to build up and pass through, persistent and large amounts can cause leakage and odor. If you experience any odor or leaking from your ostomy, let a medical professional know immediately so they can help you resolve it. There are several things you can do at home, however, to prevent stoma fluid leakage.


What Causes Stoma Fluid Leakage?

So why do pouches sometimes leak? Most often, it’s due to a poor fit and improper skin preparation. Pouches that are too big for your stoma will not be able to adhere properly and can pop off or dislodge while you’re moving around. Additionally, ostomy wafers alone may not be enough: Many surgeons recommend using an adhesive barrier between your skin and your pouch.


So, Why Are My Pouches Leaking?

Ostomy leaks can be caused by many factors, but the most common cause is insufficient adherence. The best way to prevent leakage is to make sure your ostomy pouch adheres properly. Here are some tips for staying leak-free Chronic leaks or pesky slow drips can sometimes be difficult to troubleshoot. There are so many variables that it's easy to feel overwhelmed. But there's one thing you should remember: what's working now might not always work tomorrow—it all depends on so many different elements of your life that change with time and energy levels and stress levels and.... Just remember that any day could bring a new problem.


How Can I Keep My Ostomy Belts From Leaking?

Ostomy belt replacement depends on how often you use your ostomy bag. If you wear it for more than 10 hours at a time, change your belts every 2-3 days. If you wear your ostomy for less than 8 hours, replace them once per week. Of course, if you notice cuts or sores on your skin, change out your belts as soon as possible.


When Should I Replace My Ostomy Belts?

Not everyone with an ostomy has problems with belts leaking. But if you’re one of those who does, then it can be tough to know when you should replace your belts. Luckily, there are some signs that indicate when you should change your belts. If your current belt is cracked or shows signs of wear and tear (such as discoloration), it may be time for a new one.


Thursday 17 June 2021

All about an Ileostomy

Ileostomies are another type of ostomy that is used to help with healing the colon or large intestine. 

In a lot of cases, this is usually not done initially, but instead as a last resort, and might be done to save lives. 

While there are stigmas that are negative about this, it’s important to understand what goes into an ileostomy, and of course, what this procedure can do for you. 


Why You Might Need an Ileostomy 

This is typically done if the colon is inflamed, damaged, or not working. 

There are a few reasons why you might need one, however the most common are Crohn’s disease, bowel cancer, and ulcerative colitis. 

Bowel cancer usually uses this as a last resort, when the person has already tried radiotherapy and chemotherapy in order to shrink the cancer, but is unable to fully eliminate it. In some cases, this is a temporary surgery, or a permanent one, depending on what stage the cancer is. 

Can Be Temporary or Permanent 

Depending on the situation and problems, you might need permanent or temporary ileostomies. 

Temporary ones typically happen when you need to heal your digestive tract, and diverts the waste to another area so that the place can heal. It also helps bring it back to full function. Temporary ones are usually called loop ostomies. 

Permeant happens when the large intestine is unable to be connected to the anus again, and usually is when the colon or rectum needs to be taken out or moved, mostly in the case of bowel cancers or severe Crohn’s disease.  These are typically called end ileostomies too. 

Usually, whether it’s a temporary fix or a more permanent one, you need to be mentally and physically ready for this, and the post-op care for this too. 


How does the Procedure Work 

Typically, this begins with an incision near the right of the abdomen which will create the stoma, where the waste will be expelled. 

However, there are three different types, which are the end, ileo-anal, or loop ileostomies. 

End ileostomies involve taking out your entire colon through the incision, and then the ileum, or small intestine is then pulled through there to create a stoma.  This can be both a temporary or permanent fix. 

The second is the loop, which is where a looped part of your small intestine is pulled from the abdomen, opened up, and then attached once again. The rectum and colon are then in place, and you have the openings super close to one another. This is a more temporary option. 

Finally, there is ileo-anal pouches which is where you’re literally given a pouch that’s created by joining the ileum and anus together so that bowel movements are normal.  This is oftentimes called a J pouch, and it does require healing, but it is a temporary and reversable procedure. 

How to Handle Post-Op Care 

Post-op care involves you in the hospital to properly recover. The nurse will also tell you about how to take care of the stoma. 

Typically, the recovery period is about two weeks, but after about 3 months, you can go back to normal activities. 

Complications 

Complications do happen in some cases. 


Typically, they involve obstruction where the ileostomy doesn’t work, and typically, fi this doesn’t happen after 8 hours, you need help. 

You may also experience hydration since your body needs water due to no large intestine. 

You might see mucus come from the rectal area, however, if there is puss and blood, you might have to call your doctor. 

Finally, there is vitamin B12 deficiency.

And there you have it, everything you need to know about an ileostomy. 


Saturday 16 March 2019

Surgery for Those with Ulcerative Colitis

Living with a chronic condition such as ulcerative colitis means different kinds of treatment approaches including medication, changes in diet, supplements, and surgery. Surgery can be scary though, but here, we’ll go over the most common surgical options for ulcerative colitis treatment. 

Complications which Require surgery 

The need for emergency surgery in those with ulcerative colitis usually involves sudden, severe ulcerative colitis treatments, where steroids and IV doesn’t control your symptoms. Sudden colitis can lead to toxic megacolon, which is a severe enlargement of your colon, which causes distension, swelling pain, rapid heart rate, dehydration, and fevers too. If you have bleeding from deep ulcerations, you might need emergency surgery to get this handled. You also may need to get it if you have colon perforation, which is where a hole is created due to ulcerative colitis getting out of hand. This can cause the contents of your intestine to spill which causes peritonitis, and this is life-threatening and may require immediate surgery. 


The Procedures 

Usually, you trat ulcerative colitis with a proctocolectomy, which is the removal of both the rectum and colon, which is essentially your entire large intestine. You can either get a proctocolectomy with the ileal pouch and ileal anal anastomosis, which is a porch that eliminates the ostomy need, also called a j pouch. The other option is a proctocolectomy that has an end ileostomy, and this is where they remove everything, don’t connect the ileum and make the pouch, and instead, you’re left with an ostomy. Usually, they go with the j pouch surgery since it’s one of the more common ways, and it helps to restore your bowel function, and allows the stool to pass via the anus once more. 


A total Proctocolectomy with the End Ileostomy 

This I where they remove the colon, the anus, and the rectum, and helps create the end ileostomy that allows for waste to exit. This is similar to the temporary ileostomy, but this is permanent. They make a stoma, which is a hole in your abdomen about a quarter size, pink, and looks shiny and moist usually.  You do need to wear a pouch over this, and that must be emptied a few times a day.

Typically, you put the ileostomy on the lower part of your abdomen, near the righthand side of the naval, right under the beltline. You should always talk to your doctor if you notice infection near the injury site, if no waste material is coming out for about 6 hours, or you have cramps and nausea, there might be a blockage. If it protrudes further than the wall of the abdomen, this is the prolapse, and it may also retract further inwards, titled a retraction. 

What to expect After surgery 

Usually, after an ostomy or J pouch surgery., you recover pretty readily, and you should be able to work on normal actions after you recover. There is an adjustment period of about a year afterwards, and you will probably be on a soft food or liquid diet for a bit after surgery, from where you’ll then have bland, solid foods. You will need to chew the food thoroughly so that it doesn’t irritate the stoma or anus. 


You also will need 6-8 glasses of water each day. Some may feel phantom bowel movements, which is pretty normal, and it does normally resolve over time. The doctor may also say limited physical activity for about six weeks, depending on surgery type. You also should talk to your doctor about sexual activity post-surgery since it can be a problem. 


Monday 18 June 2018

Tips on How to Avoid Ostomy Odor

We’ve been there. 

You’re trying to just live your life with an ostomy, and then you smell it—the dreaded ostomy odor. 

An ostomy comes with a lot of changes, including dietary changes, and what you consume from here on out does impact the expel. So that means od of course. 

For those who go out in public, this is a huge concern. After all, you don’t want to smell bad and have it impact how others view you, right? 

Save the stress, keep your social life in check and start preparing for when you go out with these helpful ostomy tips for keeping smell at bay. 

First, Look at How Your Body Reacts to Some Foods and Drinks 

The first thing is you’re going to need to learn how to monitor your body’s reactions to the food you consume. 

Different foods create different responses, and this is something that’s different for everyone. 

There are some foods that produce a lot more gas within, and that impacts your ostomy bag. It can also create a sound, which is embarrassing too. So watch out for this. 

Those that are high in fiber and have a lot of sugars might also impact the smell and gas too. 

You should first begin by consuming food, and from there, seeing how your body reacts. This goes for fruits and veggies, but also look at how your body reacts to alcohol especially beer, soda, dairy, nuts and meats, and other foods that are high in sugar. 

Slowly introduce these in, and see how your body reacts to this, so you can see what is creating gas.  Many people don’t realize that if you monitor this, you’ll be able to see what causes reactions, so that when you’re out, you can avoid those foods. 

You can also avoid odors by eating less fish, asparagus, onions, and garlic, since they tend to create more odor. 

Empty the Pouch 

If it’s smelly, empty it out. when you let waste accumulate, it becomes stronger.  Don’t let your pouch go to over half full, and you should definitely empty it as well if it starts to feel heavy. That’s because it makes the seal loose, which then causes waste to seep out and makes it smellier too. 

If you’ve recently gotten your ostomy, talk to the nurse or doctor on the best way to do this both when out of the house, and in private too, and make sure you empty it the correct way every single time. 

You want to do this 2-3 times a day to avoid odors. 


Consider an Odor Eliminator 

If there is still trouble, consider purchasing odor eliminators. This is something that comes in multiple forms, so if you’re not sure what’s right for you, try this. 

Some options include odor eliminator sprays, deodorants, and other products you can insert. However, you should try to avoid using tic tacs to eliminate odor, since it’s dicey in terms of success. 

Get a Filter 

Consider buying a filter, which helps eliminate the gas and reduces seal strain. That way, you can properly filter out the odor without worrying about the seal on your bag. 

Get a  New Ostomy Bag 


Finally, consider a new ostomy bag, since you might not have the right one for your stoma.  The seal might also need to be replaced too, especially if you’re struggling to fit it tightly on yourself. 

Ostomy odor is embarrassing and it’s not something people want to deal with, especially with the odor leaks and implications. Luckily, there are ways to fix this. 7


How do I Clean My Peristomal Skin

Having an ostomy means that you need to also focus on one thing—cleaning your peristomal skin.

That’s the skin that’s around your stoma. It’s also very fragile, so with one wrong move it can be damaged. 

However, if you don’t clean it, it can cause irritation, infection, and a whole slew of other issues, so you need to keep this clean.

Here, we’ll go over what the skin is, and how you can clean it. 


What does Peristomal Skin Look Like? 

Peristomal skin is of course that opening in your stoma after an ostomy occurs. 

This skin is delicate, so it does require you to be diligent in your routines. 

Normal peristomal skin, is a pinkish or reddish color that is similar to the way your mouth looks. 

If you’re not sure whether your stoma looks correct, stand by a mirror, and look at it.  It should be shiny, the pinkish-red color, and moist as well. 

If you notice the skin looking any different, is irritated, and may have bleeding or even pain when touching, you should definitely contact your doctor for ways to fix this. 

If you do notice tiny painful red bumps as well, that’s also infection, or folliculitis, and you should avoid shaving to prevent this. Finally, you should also look for red rashers, since that’s a fungal infection, and that comes with both burning and itching. 

How to Keep the Skin Healthy 

You should make sure that you keep it clean whenever possible. 

This can be avoided by not using a ton of moisturizers, residue, and some oils, since this does affect the adhesion of the pouch. 


You should also look at the type of soap you’re using. If you use certain kinds of soaps, it impacts the skin barriers, weakening it and putting you at risk for leaks and irritating the skin.

When you bathe, make sure that if you use a two-piece system, you don’t remove this, since it does break down the adhesion location. 

However, when cleaning this, don’t be prudent with the soap and water.  You cannot damage your stoma with it, only if you clean it excessively and the soaps cause abrasion, so don’t be afraid to keep it clean. 

Since some products do cause adhesion and irritation, some people will only use water, which is sufficient, but make sure you clean your hands so you don’t contaminate the area. 

When using soaps, try to avoid anything too heavy, and work to a mild soap for best results. You should also avoid the following: 

  • Skin creams 

  • Powders 

  • Lotions 

  • Wipes 

  • Rubbing alcohol

  • Ointments and medications 

Or anything else that isn’t approved to be used on ostomates. 

How to Clean It 

This is simple. First take some warm water and run a washcloth under it. 

Then rinse the stoma area, removing any skin paste or adhesion before you do so.  You should also get rid of old adhesions as well so that there isn’t problems with attaching this again. 

Use motions that are gentle and circular, not putting a ton of pressure on that area.  :Usually, if you’re conscious of the movements, it’s simple and takes a few moments.


Never scrub hard, or use exfoliating items on a stoma. 

If you do see a little bit of blood, don’t freak out.  it might be because a couple of the blood vessels did get exposed. If the bleeding won’t stop after you clean it, talk to the doctor. 

And there you have it, everything you need to do to clean the stoma. 


Sunday 18 June 2017

How to Size Your Stoma for the Best Pouch Fit

 If you’re getting an ostomy, you probably know you’re going to have to care for it. 

One part of this, is getting the right type of equipment so your seal is tight. And unfortunately, there isn’t one specific way to do this. 

We’ll go over here how you can properly fit your equipment on your stoma, and also what type of pouch system is best for you. 

As you know, the stoma is the opening in an abdomen which is connected either to the urinary or digestive tract to expel waste from your intestines, or your bladder. This can be a temporary or permanent action, so you need to take care of it regardless, and make sure you get the best fit on your pouching system too. 

The First Few Weeks 

In the first few weeks, your stoma will not be the same shape as it will ultimately be.

It also will look swollen, where the swelling is larger, but it will subside as you go along. 

It’s important to measure the stoma on the regular and adjust the barrier as well. Eventually, it will finally level out and you won’t have to measure it all the time. 

However, this does still change, so remember that if it doesn’t fit one time, that doesn’t mean it may not fit down the road. 

Usually, within the first 8 weeks after the surgery, the stoma does the most shape. 

This is usually because of weight loss or gain, hernias or prolapse, aging, or other significant physical appearance changes. If you see the stoma changing, make sure you measure it so you use the right barrier and wafer for your skin. 

How to Measure 

You will probably do this with the ostomy nurse or your doctor a few times, and you will learn this initially, and what problems might arise., 


However, naturally you will have to do this on your own, so it’s good to have a series of steps. 

First, you need to get your supplies, including the barriers, scissors, a marker or pen, some gauze, the adhesive or a mirror in order to assist with this. 

Next, you want to prepare the stoma by taking off and emptying the bag, then washing the area, removing hair and any adhesives that are on before. however, so make sure the stoma is fully dry before you continue. 

Next, you want to measure the stoma, and see how far it protrudes out of the hole without a ton of skin.  You typically will have a gap between 1-3 mm between the stoma and the guide.

Next, you take that measurement and then put that on the skin barrier and adjust it before you apply it.  Sometimes, it takes a minute to adhere to the area, and make sure you use the scissors for the wafer since you don’t want to damage cutting it. 

Finally, it’s time for a test run. Put it right over the stoma, and then test the way that this fits. You might need to adjust before you take the backing off of it and put the ostomy appliance back on. 


Remember, you also can choose different types of barriers too, since some people might prefer the convex, the pre-cut, or even the cut-to-fit types.  You can talk to your doctor about the options that you have, and of course what’s best for you. 

This can be a challenge to do initially, especially if you’ve got a loop ostomy or other types, but hopefully, now that you know a little bit about it, you can from here, get the best results possible from your ostomy too. 


Ostomy Pouch Bag

Individuals with ostomies can have a slight fear of not being able to handle the pouching system correctly and in result cause complications...